This Content Production Scaling template will give you a sneak peek into how our own ClickUp Content Team scales production of their blog content. While this template uses blog content as an example, you can use this production workflow for other kinds of content too!
Content scaling is one of the most popular and effective strategies for boosting organic traffic, leads, visibility, revenue, and much more. It creates a nearly endless supply of relevant content that can be leveraged in multiple ways to establish your brand as a reliable information hub.
The ClickUp Content Production Scaling Template is for any writer, editor, or team in the midst of building their own scalable production process—and it can be tailored to suit any type of content. Refer to our content production scaling blog for greater detail on the eight steps below to lock down your strategy and navigate this template like a pro.
Step 1: Creating a content backlog
The content backlog is the first step in your content scaling effort and serves as a centralized hub for all future content pieces. The key distinction between your content backlog and a content database is that the backlog focuses on upcoming content, rather than what’s already in progress.
Once you’ve applied the Content Production Scaling Folder to your Workspace, you’ll find various views pinned to the top of your screen and along your sidebar, including a designated Backlog view within the Blog Posts (In Progress) List.

Our pre-built backlog is specifically designed for optimal speed and convenience. From a single view, you can access blog briefs, comments, and even live URLs for upcoming blog updates.
These fields, among others, are automatically displayed when reviewing your backlog and will remain associated with their respective blog tasks throughout the entire workflow. When a writer is prepared to work on a blog task from the backlog, it progresses to the next phase in your scaling process.
From the backlog, you can modify existing task names to align with your blog topics or create entirely new tasks for each keyword. When a blog topic is ready to join the content production workflow, the writer or editor will update the task assignee, deadline, and status, and the template will take it from there.
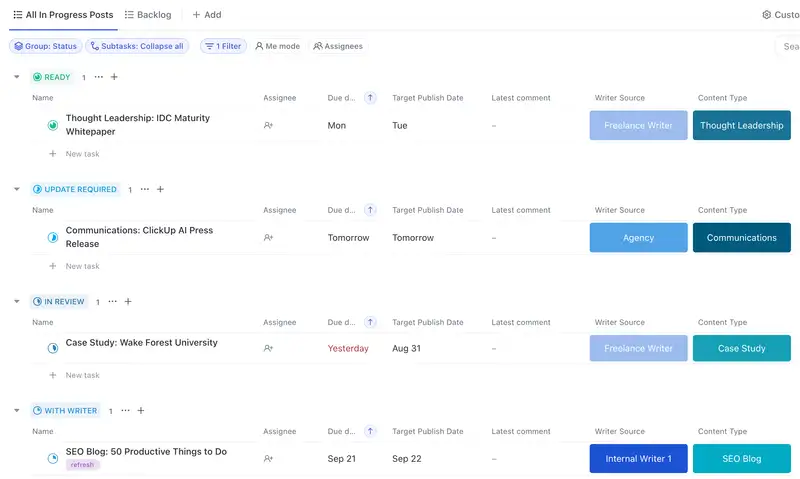
Step 2: Organize your blog database by task status
Changing the task status from To Do or Brief Ready automatically moves the blog task to the pre-built database List called All In Progress Posts.
The blog database is the centralized hub for all in-progress content—and the more details you can add at this stage, the better. Filling in as much key information as you can will make your database easier to prioritize, track, filter, and navigate throughout the content process.

For even greater efficiency and organization, add the content type or category as a prefix to the task name. Example: "SEO Blog: Productive Things to Do at Work." Customizing the task name prefix will make your database easier to read, and create more opportunities to filter and group your blog tasks. This is especially helpful for teams scaling multiple types of content and pillar topics.

Step 3: Customize task details for peak efficiency
This framework is fully customizable to align with your team’s specific needs or goals. Meaning that every aspect of this template can be modified.
The fields seen in the columns of the content database and backlog views can also be found within each individual task. In the Task view, you'll first see the blog task’s name, status, assignee, and due date. Scrolling further reveals the additional Custom Fields included in this template:
- Content Type: Your content type represents the blog’s key audience or topic. This can also be modified to better reflect other other processes. For example, your content type Custom Field might represent different departments, media types, or social media channels
- Target Publish Date: Separate from the due date and actual publish date, the target publish date provides a general idea for your upcoming content schedule, with plenty of time to pivot if necessary
- Writer Source: Track different authors (internal, external, or agency) to quickly sort and identify assignments
- Blog Brief URL: Easily access your blog brief or guidelines directly from the blog task
- Draft URL: Open blog drafts right from your List or Task view for faster edits
- Live Blog URL: Link to the published article within the task for better organization and efficiency when exporting blog URLs
- Publish Date: Accurate publish dates are key for documenting progress, monitoring goals, and analyzing run rates

The changes you make to any blog task are immediately updated across all Lists and views for complete accuracy. Like working from a clean dataset, gradually adding these task details makes your work easier to automate, sort, filter, and present throughout the content scaling process.
Step 4: Assign content
To optimize content distribution, we suggest assigning tasks in batches as opposed to all at once. This allows writers to prioritize their workloads and creates a consistent posting schedule each week.
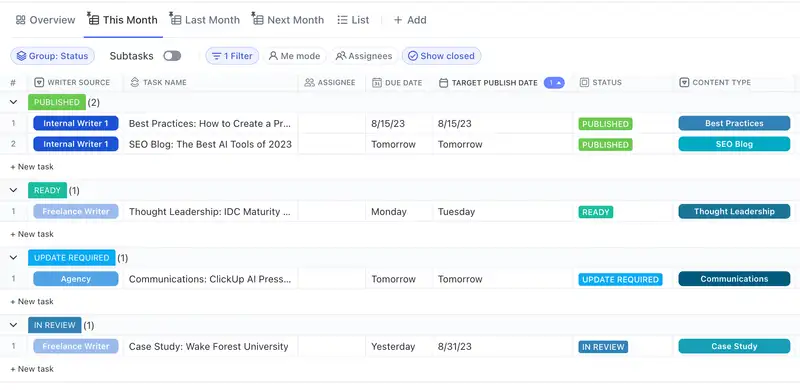
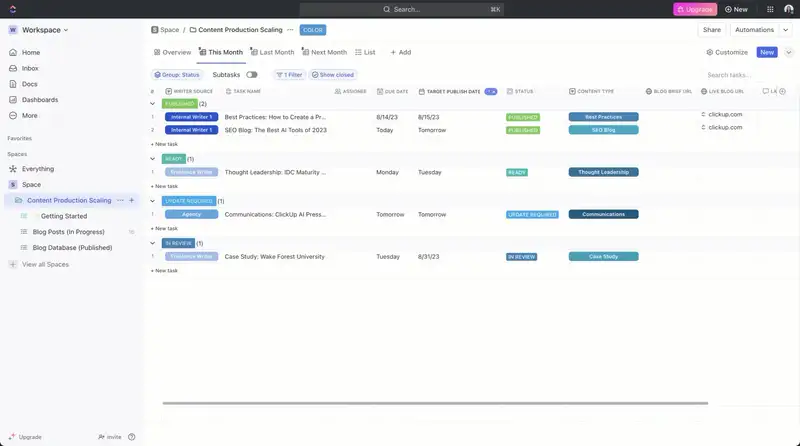
Step 5: Build your monthly views
Opening the Content Production Scaling Folder takes you right to your three monthly views labeled This Month, Last Month, and Next Month. Essential for managing the team’s workload, these Table views are grouped by the Writer Source Custom Field and provide a quick breakdown of each writer’s total number of assigned blogs per month.
Once the backlog is established, the content database is updated, and key task information is filled in, the monthly views populate automatically. Simply rename each view to match the current date for clarity and ease of use. For future months, duplicate a view to preserve past work and continue tracking new content. You can also customize this view to emphasize other essential aspects of your workflow, such as category, pillar topic, or assignee.
Step 6: First draft comments and reviews
To maintain workflow momentum, use assigned comments to delegate action items directly to reviewers. Visibility across every task is crucial, as both the blog database and monthly view display the most recent comment for each blog task.
The writer adds their draft link in the Draft URL Custom Field and posts a comment in the blog task, tagging the reviewer. To ensure up-to-date views and Lists, promptly update the task status to In Review.
Once the reviewer reads the draft and provides suggestions, they will comment back to the writer and update the task status to Update Required. The writer then makes the necessary changes, adds any missing elements, and prepares the draft for final review.
Step 7: Format content in the CMS
After addressing outstanding comments and making necessary updates, promptly add the reviewed content to your content management system (CMS). By the time a writer finishes formatting the draft in the CMS, it should be nearly ready for publication.
Maintain consistency and efficiency by following the same commenting process as the initial round of edits (Step 6). Update the task status from Update Required to Final Review. Keep all review-related discussions organized within the task's comment thread.
Step 8: Review, Publish, and Mark as Done

Editors should make any final adjustments directly in the CMS. Once the content is ready for publication, update the task status to Ready and notify the writer in the comment thread.
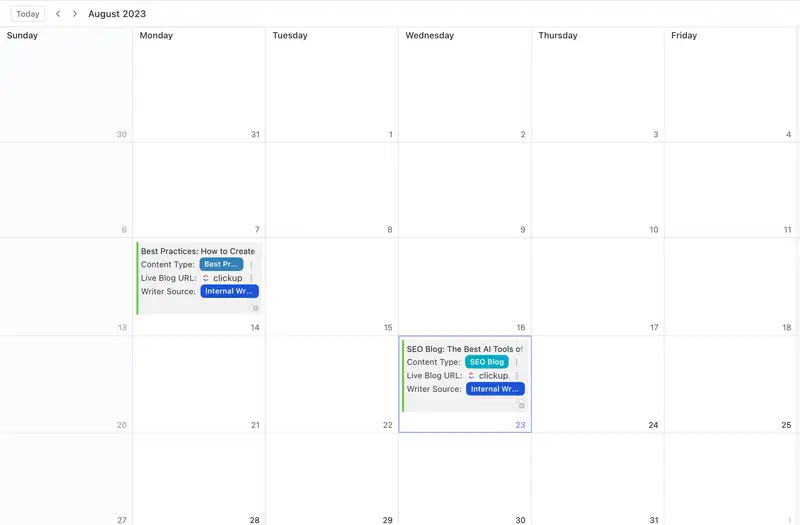
Changing the blog task status from Ready to Published automatically removes it from the content database and places it in the Published List. This allows for monitoring the team's active workload while tracking progress towards the overall goal.
In the Published List, a separate Calendar view showcases all published posts. Use this content calendar to visualize the number of blogs published per day, week, or month, ensuring adherence to a consistent posting schedule.